drawing formats for 3d printers
Infill patterns are sometimes disregarded in 3D printing because information technology's only one role of many settings for your prints. In that location are several infill patterns only when looking through the list, I wondered to myself, which infill pattern is the best in 3D press?
The all-time infill pattern for 3D printing is a hexagonal shape such as Cubic if you are after a good balance of speed and forcefulness. When you determine the function of your 3D printed part, the best infill pattern will vary. For speed the best infill pattern is the Lines design, while for strength, Cubic.
In that location is a little more to infill patterns than I first realized, so I will go into some more details about the nuts of each infill pattern, as well equally which patterns people view every bit the strongest, the fastest and the all-round winner.
What Types of Infill Patterns are At that place?
When nosotros look at Cura, the most pop slicing software out at that place, here are the infill blueprint options they take, along with some visuals and useful information.
What is Grid Infill?

This infill pattern has a cross-over pattern which creates two perpendicular sets of lines, forming squares in the middle.
- Bully strength in the vertical direction
- Good strength in the direction on the formed lines
- Weaker in the diagonal direction
- Creates a adequately skilful, smooth top surface
What is Lines/Rectilinear Infill?

The Lines pattern creates several parallel lines beyond your object, with alternating directions per layer. So basically, ane layer has lines going 1 way, and then the next layer has lines going across the other way. It looks very like to the filigree pattern but there is a departure.
- Usually weak in the vertical direction
- Very weak in the horizontal direction except in the direction of the lines
- This is the all-time pattern for a polish top surface
An example of how the Lines and Filigree design are different is shown beneath, where infill directions are default at 45° & -45°
Lines (rectilinear) infill:
Layer 1: 45° – diagonal right direction
Layer 2: -45° – diagonal left direction
Layer three: 45° – diagonal right management
Layer 4: -45° – diagonal left direction
Grid infill:
Layer 1: 45° and -45°
Layer 2: 45° and -45°
Layer iii: 45° and -45°
Layer 4: 45° and -45°
What is Triangle Infill?

This is pretty cocky-explanatory; an infill design where three sets of lines are created in different directions to course triangles.
- Has an equal corporeality of strength in each horizontal direction
- Swell shear-resistance
- Trouble with flow interruptions and so loftier infill densities have low relative strength
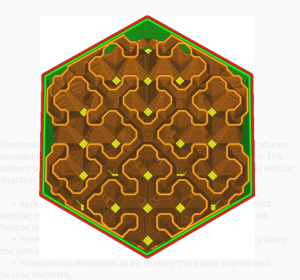
What is Tri-Hexagonal Infill?

This infill pattern has a mixture of triangles and hexagonal shapes, interspersed throughout the object. It does this by creating iii sets of lines in iii different directions, but in a way that they don't intersect in the same position with each other.
- Very strong in the horizontal direction
- Equal force in each horizontal management
- Bully resistance to shear
- Requires many top skin layers to become an even pinnacle surface
What is Cubic Infill?

The Cubic pattern creates cubes which are titled and stacked, creating a 3-dimensional pattern. These cubes are oriented to be standing on corners, and then they can be printed without overhanging internal surfaces
- Equal force in all directions, including vertically
- Pretty proficient overall strength in every direction
- Pillowing is reduced with this pattern because long vertical pockets aren't created
What is Cubic Subdivision Infill?
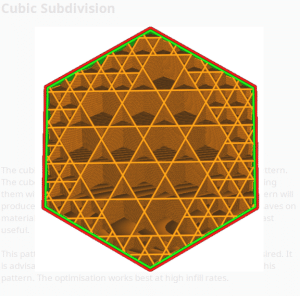
The Cubic Subdivision design also created cubes and a iii-dimensional pattern, but information technology creates bigger cubes towards the middle of the object. This is washed then the nigh important areas for force take good infill, while saving material where infill is the least effective.
Infill densities should be increased with this pattern because they can be really depression in the mid-areas. It works past creating a series of viii subdivided cubes, so the cubes which are hitting walls go subdivided until infill line distance is reached.
- Best and strongest pattern in terms of weight and printing time (strength to weight ratio)
- Equal force in all directions, including vertically
- Too reduces the furnishings of pillowing
- Increasing infill density means infill shouldn't show through the walls
- Has many retractions, not slap-up for flexibles or less viscous materials (runny)
- Slicing time is relatively longer
What is Octet Infill?
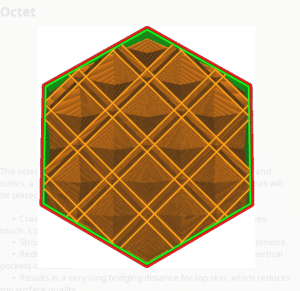
The Octet infill pattern is another 3-dimensional pattern which creates a mix of cubes and regular tetrahedra (triangular pyramid). This blueprint produces multiple infill lines adjacent to each other every so often.
- Has a strong internal frame, especially where the next lines are
- Models with a medium thickness (around 1cm/0.39″) do well in terms of strength
- Besides has reduced pillowing effects because long vertical pockets of air aren't created
- Produces bad acme quality surfaces
What is Quarter Cubic Infill?
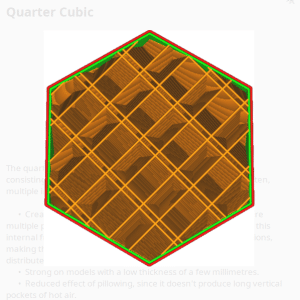
The Quarter Cubic is a little more complex in explanation, merely it's quite like to the Octet Infill. It's a three-dimensional pattern or tessalation (close arrangement of shapes) consisting of tetrahedra and shortened tetrahedra. Just like Octet, it also places multiple infill lines adjacent to each other every so often.
- Heavy loads dissapates weight to the internal structure
- Frame is oriented in 2 different directions, making them individually weak.
- Great relative strength for models with low thickness (few mm)
- Reduced pillowing effect for top layers because long vertical pockets of air aren't produced
- Bridging altitude for this pattern is long, so it can negatively effect tiptop surface quality
What is Concentric Infill?
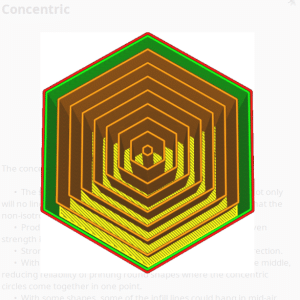
The Concentric infill blueprint simply creates a series of inner borders parallel to the perimeter of your object.
- At an infill density of 100%, this is the strongest pattern equally lines don't intersect
- Bang-up for flexible prints since information technology is weak and even in all horizontal directions
- Has more strength in the vertical management versus horizontal
- Weakest infill pattern if not using 100% infill density since horizontal forcefulness isn't there
- 100% infill density works ameliorate with non-circular shapes
What is Zigzag Infill?

The Zigzag pattern simply creates the very pattern equally it'south named. It's very similar to the Lines pattern only the difference is, lines are continued in ane long line, resulting in less menstruum interruptions. Mainly used in back up structures.
- When using 100% infill density, this pattern is the second strongest
- Better for round shapes compared to the Concentric blueprint at 100% infill percentage
- I of the best patterns for a smooth top surface, equally line distance is very little
- Has a weak strength in the vertical direction every bit the layers have inadequate bond points
- Very weak in the horizontal direction, other than in the direction the lines are oriented
- Bad resistance to shear, and so fails quickly nether a load
What is Cross Infill?
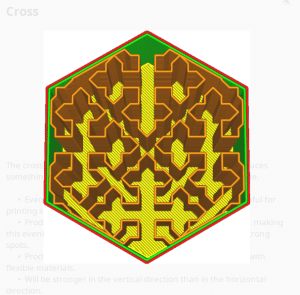
The Cross infill pattern is an unorthodox pattern which creates curves with spaces in between, replicating cross shapes inside an object.
- Dandy pattern for flexible objects since it is evenly weak-pressured in all directions
- Long straight lines aren't produced in the horizontal management so it isn't strong in any spots
- Has no retractions any, then it's easier to print flexible materials with
- Stronger in the vertical direction than horizontal
What is Cross 3D Infill?
The Cantankerous 3D infill pattern creates those curves with spaces in between, replicating cross shapes inside the object, but besides pulses along the Z-axis making information technology weaker in the vertical direction.
- Creates even 'squishy-ness' in both horizontal and vertical directions, the best pattern for flexibles
- Has no long straight lines so information technology'due south weak in all directions
- Besides produces no retractions
- This takes a relatively long time to slice
What is Gyroid Infill?

The Gyroid infill pattern creates a series of waves in alternating directions.
- As strong in all directions, but not the strongest infill pattern
- Corking for flexible materials, but produces a less squishy object than Cross 3D
- Good resistance to shearing
- Creates one volume which allows fluids to flow, great for dissolvable materials
- Has a long slicing time and creates large Thousand-Code files
- Some printers may detect it hard to keep upwards with the G-Code commands per 2nd, specially over serial connections.
What is the Best Infill Pattern for Strength (Cura)?
Y'all'll find many people arguing over which infill design is the best for strength. These infill patterns consist of high strength in multiple directions, usually existence categorized as 3-dimensional patterns.
The all-time candidates that people have thrown out in that location are usually:
- Cubic
- Gyroid
Luckily it's a quite short list so you don't take to get through besides many to find your perfect fit. I'll become through each strength infill design to assistance you decide which to become for. Honestly, from what I've researched, there isn't too much of a difference in strength betwixt these just one does accept the upper hand.
Cubic
Cubic is great because of its fifty-fifty strength is from all directions. It'due south known as a strong infill design by Cura themselves and has a number of variations showing, simply how useful information technology is as an infill pattern.
For pure structural force, Cubic is very well-respected and popular for 3D printer users out there.
It can endure from overhang corner warping depending on your model, but mostly it prints very smooth.
Gyroid
Where gyroid prevails is its uniform strength in all directions, as well as the fast 3D printing times. The 'crush' force examination past CNC Kitchen showed the Gyroid infill blueprint having a failure load of exactly 264KG for a x% infill density in both the perpendicular and transverse directions.
In terms of printing time, there is around a 25% increase compared to the Lines pattern. Cubic and Gyroid take very similar printing times.
It does utilize more material than Cubic but it's more prone to press issues such as layers not stacking.
The high shear strength, resistance confronting bending and depression weight of this infill design make it an ideal choice over most other patterns. Not simply does information technology have high strength, it's also neat for flexible prints.
Specific strength tests run by Cartesian Creations found that the strongest infill pattern was Gyroid, compared to 3D Honeycomb (Simplify3D pattern like to Cubic) and Rectilinear.
Information technology showed that the Gyroid pattern is great at arresting stresses, at 2 walls, 10% infill density and 6 bottom and elevation layers. He plant that it was stronger, used less fabric and printed faster.
The choice is yours, merely I would personally go for the Cubic design if I want maximum load-begetting strength. If you want forcefulness, along with flexibility and quicker prints, Gyroid is the pattern to get with.
There are factors other than infill pattern for maximum strength. CNC Kitchen found the primary factor existence the number of walls and wall thickness, but it still has a signficant influence.
He establish this out by testing a number of unlike infills, densities and wall thickness and found out simply how pregnant wall thickness was.
This hypothesis too has more than evidence behind it with an article written in 2022 on the Effects of Infill Patterns on Tensile Forcefulness. Information technology explains that different infill patterns had a maximum of five% tensile strength differences meaning that the pattern lonely didn't make as well much difference.
Where the chief difference came in terms of infill was on the infill pct. Although, tensile strength isn't the merely forcefulness sought after and so this doesn't hateful infill patterns can't make a difference of more than than v% functionality-wise.
What is the Fastest Infill Pattern for Speed?
If nosotros are looking at the best infill pattern for speed, the clear factors here are which patterns have the near directly lines, less movement and to the lowest degree material used for the print.
This is a pretty easy ane to determine when nosotros think about the pattern choices we have.
The best infill pattern for speed is the Lines or Rectilinear blueprint, which is the default infill pattern in Cura. Patterns with the well-nigh directional changes usually have longer to print, so straight lines print the fastest with great speed.
When we look at the important factor in speed and using the to the lowest degree material, nosotros look at the parameter of the best strength per weight ratio. This means, in terms of strength and weight, which infill pattern has the best amount of strength in relation to how much infill is used.
We wouldn't want to simply employ the least material and take an object that falls apart easily.
Tests take actually been carried out on this parameter, where CNC Kitchen found that the normal Rectilinear or Lines pattern has one of the best forcefulness per weight ratio and uses the least amount of material. The Cubic Subdivision pattern is another contender for using the to the lowest degree cloth. It creates high density infill around the walls and lower in the heart.
It'southward a perfect pattern to accept as a default for your prints, other than when you lot have a specific purpose for functionality and strength. Not only does the Lines pattern or Cubic Subdivision print very fast, it uses a low amount of infill and has practiced strength.
What is the Best Infill Pattern for Flexible 3D Prints?
The best infill patterns for TPU and flexibles are:
- Concentric
- Cross
- Cantankerous 3D
- Gyroid
Depending on your model, there will exist an platonic pattern for your flexible 3D prints.
As previously mentioned, the Concentric pattern works best at an infill density of 100%, simply generally for non-circular objects. It has adequately good vertical strength simply weak horizontal strength, giving it the flexible characteristics
The Cross and Cantankerous 3D patterns take even pressure level on all sides but the Cross 3D also adds in the vertical direction element, merely it does take longer to slice.
Gyroid is cracking when y'all are using lower density infills and is useful for a few reasons. It has fast press times, peachy resistance to shearing but is less flexible overall, compared to the other flexible patterns.
If you are looking for the all-time infill pattern for pinch then Gyroid is one of the all-time choices.
How Much Does Infill Density or Percentage Matter?
Infill density affects a number of of import parameters for your 3D printed part. When you lot hover over the 'Infill Density' setting in Cura, information technology shows that information technology affects Top Layers, Bottom Layers, Infill Line Distance, Infill Patterns & Infill Overlap.
Infill density/percent has a pretty meaning impact on part strength and printing time.
The higher your infill per centum, the stronger your part will be, only at infill densities over 50%, they become a lot less meaning in terms of adding extra force.
The departure between infill density that you fix in Cura has a big divergence in terms of what it'due south irresolute in your part construction.
Below is a visual instance of xx% infill density vs 10%.

A larger infill density means your infill lines will be placed closer together, which means more structures are working together to give a part strength.
Yous can imagine that attempting to pause apart with low density would be much easier than i with high density.
It's important to know that infill density varies widely on how it affects a part due to differences in infill patterns.
Basically, a change of 10% infill to twenty% infill for a Lines design isn't going to be the same every bit the same change with a Gyroid pattern.
Near infill patterns have like weight with the same infill density, simply the Triangle pattern showed an almost 40% increment in overall weight.
That'southward why people who use the Gyroid infill pattern don't require such loftier infill percentages, notwithstanding even so get a respectable level of part strength.
Low infill densities tin result in problems such every bit walls not connecting to the infill and air pockets being created, specially with patterns that have many crossings.
You can get under extrusion when 1 infill line crosses another line because of period interruptions.
Cura explains that increasing your infill density has the following effects:
- Makes your prints stronger overall
- Gives your summit surface layers better support, making them smoother and airtight
- Reduces troubleshooting issues such as pillowing
- Requires more textile, making it heavier than normal
- Takes a lot longer to print depending on the size of your object
So, infill density definitely matters when we are looking at the force, fabric usage and timing of our prints. At that place is usually a good residual to strike between infill percentages, which is anywhere from ten%-thirty% depending on what you lot intend to use the part for.
Aesthetic or parts made for looking at require a lot less infill density because it doesn't require forcefulness. Functional parts require more infill density (up to 70%), so they can handle the load-bearing over a long period of time.
Source: https://3dprinterly.com/what-is-the-best-infill-pattern-for-3d-printing/
0 Response to "drawing formats for 3d printers"
Post a Comment